About Action Items
Action items have replaced ticklers. Each action item is generated by the system based on assignment for each item that needs to be completed on a record within a specific time frame. You can view action items that are assigned to you, (and as a supervisor, those assigned to each team member). They can be viewed and access from the Action Items screen, and from the record on the Case Overview screen or Provider Overview screen for which the action needs to be taken.
All action items can be viewed by the person to whom the item is assigned, and their supervisor. Under the Home screen tab; you will select the Action Items heading to navigate to the Action Items screen.
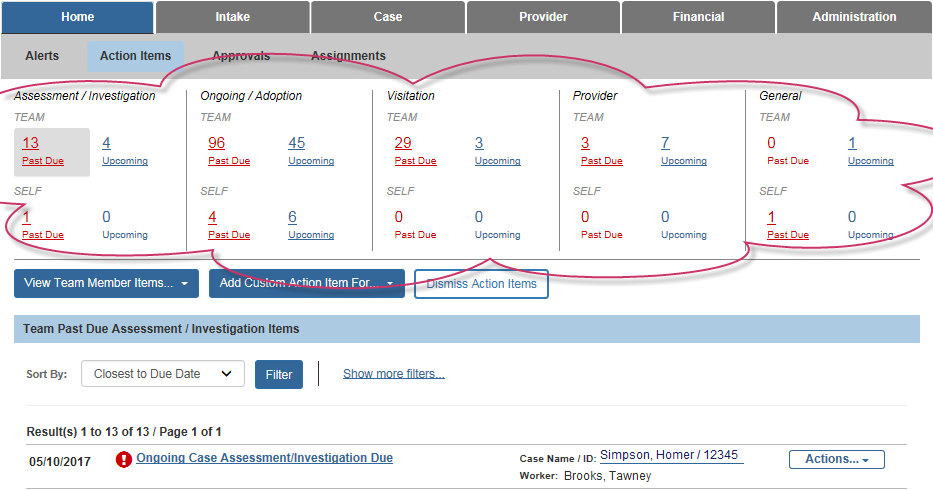
The top section of the screen displays Buckets. Each bucket is divided in to two regions; Past Due and Upcoming (due). Past due reflects the number of action items where the required amount of time to complete the task has past. Upcoming reflects the number of action items not yet past the required time for completion. When an action item is generated, it will be included in the quantity of either past due, or upcoming and display as a link, (example: 3 PAST DUE ). By selecting the link, the system will display the list associated. If there are no action items for one of the past due, or upcoming region, the system will display a zero for the region in it's bucket. If there are neither past due, or upcoming, the bucket will not display.
There are five buckets in which the total number of action items will display. They are:
Assessment/Investigation
Ongoing/Adoption
Visitation
Provider
General
This Action Items screen will only display the bucket, or buckets that have either Past Due, and Upcoming action items; and you will only see buckets in which you have assignments that require an action be taken within a specific time frame. If you are a supervisor, an additional row will display showing the total number of Past Due and Upcoming action items within each bucket for your team:
Below the buckets section the system will display Buttons viewable based on your role within your agency:

Button |
Description |
View Team Member Items |
Supervisors use this button to select from the list of their team members to view the action items in their buckets, and the detailed list associated with the region within the bucket selected. The system displays the Action Item screen as viewed by the team member selected. A bar displays above the bucket section identifying the team member who's action item screen is being viewed with a button to Return to Your Action Items view, and a button to View Team Member Items that allows the supervisor to select to view a different team member's action item screen. Because action items are generated based on assignment, the supervisor would navigate to the team member's action item screen to add a custom action item for that team member. |
Add Custom Action Item For... |
This button allows you to add a custom action item or items for yourself, or for team members within the category selected (Assessment/Investigation, Ongoing/Adoption, Visitation, Provider, and General). When adding the details for a customer action item; although the due date, category and message fields are required, the other fields provide options to specify a display date other than the system date; change the category; select assignment type, and the case/provider assignments. When adding a custom action item for a team member, there is a box to allow the worker to dismiss the action item themselves. Once a custom action item is added, it will be included in the quantity within the appropriate region (Past Due/Upcoming) of the bucket with which it is categorized until it have been completed, or dismissed. |
Dismiss Action Items |
You will see this button if you have Agency System Administrator user group security. You can use this button to search for, select and dismiss multiple action items at one time. By selecting this button, the system navigates the user to the Action Items Dismissal Search Criteria screen within the Administration module of the application. Action items can be filtered for display by selecting a Unit, Supervisor, and Employee. |
As a supervisor, you will have a button to View Team Member Items where you can select the specific team member to view the action items screen as that team member. When viewing a team member's Action Items screen, a banner will appear above the buckets identify who you are viewing the action items as. Two button appear in the banner that allow you to navigate back to your action items, or View Team Member Items... for other team members:
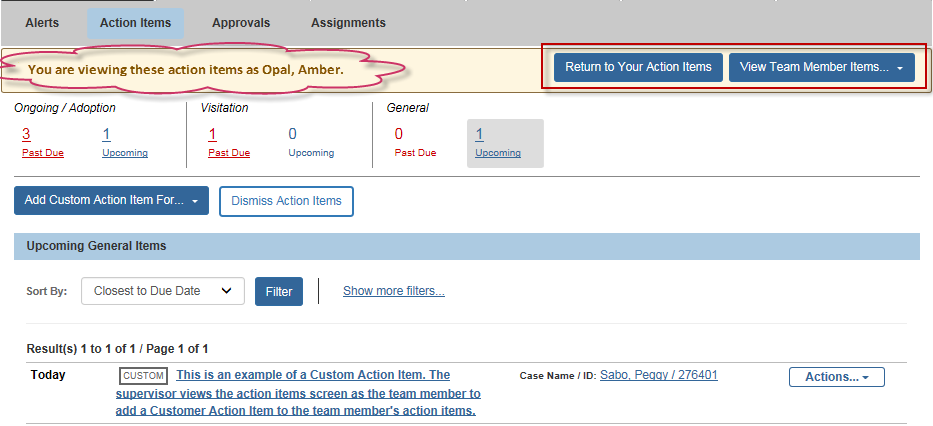
There is a button to Add Customer Action Item For each specific category. The team member's Action Items screen is where the supervisor would add custom action items that would then be assigned to that team member. And, based on your role, you may have a button to Dismiss Action Items, and a button to Generate Report.
The third section on the Action Items screen dynamically displays the heading for the list selected from the Bucket region, (Past Due or Upcoming); or identified using the available filters in the Show more filters... link option. The Sort By drop down window provides the option to sort the list to display by nearest/furthest due date or alphabetically from A-Z or Z-A.
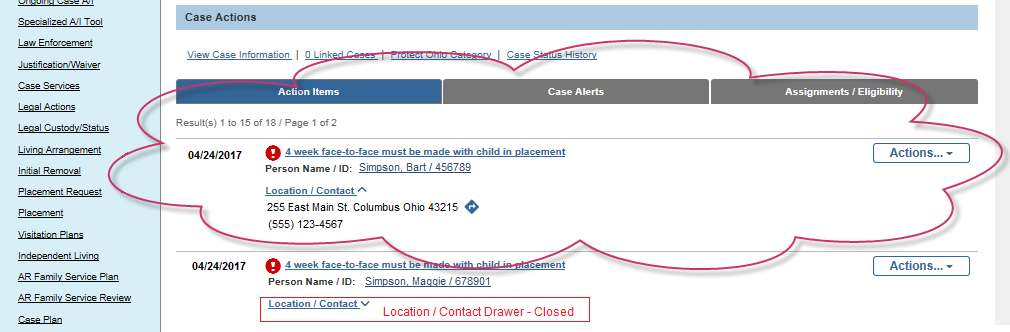
The attributes of each action item within the list includes the due date, a badge that helps identify due date status; the item name linked to the screen/task needing action, the case/provider name/ID for the item that is linked to the item's overview screen record; and each has the button allowing you to set the action priority, as well as a Dismiss Action Item.
Badge |
Description |
|
This badge will display next to an action item that falls within the time frame required to complete the actions associated. Action items with this badge are included in the quantity of Upcoming action items within the bucket for which they are categorized.
|
|
The alert badge displays next to an action item when the action item is getting close to passing the due date to complete the actions within the time frame required. Action items with this badge are also included in the quantity of Upcoming action items within the bucket for which they are categorized.
|
|
The red exclamation badge will display next to an action item that is past the due date to complete the actions within the time frame required.
|
Action items have replaced ticklers. They are generated by the system as links to the screen within the record to complete the task(s). The custom action item is a link to the Custom Action Item Details screen. Action items are generated based on assignment. They are viewable by the employee(s) assigned, and supervisor. They display on the Action Items screen and the Case Overview, or Provider Overview screen in the record for which the action item is generated.
To view an action item, or items on a case/provider record overview screen, you can navigate to the record through your workload, or if recently accessed, through the recent button found at the top, right corner of the screen. To navigate from the action items screen, you can click on the case/provider name/ID link associated with an action item within the filtered list.
Each action item listed on the overview screen has similar attributes that display for the items within the list on the Action Item screen. There is a due date, a badge with regard to time remaining when due; and the item name is linked to the screen/tasks for which it was generated. In addition, the system displays the person name/ID link for whom the action item is associated, a Location/Contact drawer that opens to display the person's address, (a badge linked to google maps with directions); and the person's contact information. As on the Action Items screen, each item has an Action button opening a window providing the option to set priority, as well as dismiss the action item.